title: React 入门 date: 2020-05-05 09:48:17
tags: React
React 是一个 MVC 框架.
React 特点
- 声明式写法
- 组件化
- 可开发多种任务
开发环境
官方脚手架 creat-react-app
需求: node > 6.0
安装命令npm install create-react-app
创建命令create-reate-app my-project
运行命令npm start
文件入口
/src/App.js
基本语法
ReactDOM.render()
React.CreateElement()
React.Component
1
2
3
4
5
6
7
8
|
const hello = React.CreatElement(
"h1",
{ className: "red", name: "Tom" },
"hello world"
);
ReactDOM.render(hello, document.getELementById("app"));
|
特点:
当插入很多数据,ReactDOM.render 会通过虚拟 DOM 方式生成一个 diff,只插入一次.
1
2
3
4
5
6
7
8
|
const name = "Tom";
const ele = (
<h1 className="red" name="Tom">
hello,{name}
</h1>
);
ReactDOM.render(ele, document.getELementById("app"));
|
书写格式
src 下新建一个组件 Demo.js
1
2
3
4
5
6
7
8
9
10
11
12
|
import React from 'react'
class Demo extends React.Component {
render() {
return <h1> Hello React <h1>
}
}
export default Demo
|
组件挂载
将组件挂载到 ReactDOM 节点上
1
2
3
4
5
6
|
import React from "react";
import ReactDOM from "react-dom";
import Demo from "./Demo";
ReactDom.render(<Demo />, document.getElementById("root"));
|
JSX
javascript 语法扩展.
在花括号{}中可以添加任意 js 的表达式(expressions).
1
2
3
4
5
6
7
8
9
10
11
12
13
14
15
16
17
18
19
20
|
import React from "react";
class Demo extends React.Component {
render() {
const todoList = ["Learn React", "Learn Redux"];
return (
<div>
<h1>Hello React</h1>
<ul>
{todoList.map((item) => (
<li>{item}</li>
))}
</ul>
</div>
);
}
}
export default Demo;
|
JSX 实质
JSX 是语法糖–React.createElement()
JSX 返回 ReactElement 对象
实操总结
//jsx 中函数必须用{}括起来,不要有空格,否则失效
//jsx 中调用类中的函数要加 this
//在 jsx 之前要把要用的参数提前解构出来
//函数中调用也要解构
组件和 Props(属性)
- 组件像函数一样,接受特定的输入(props),产生特定的输出(React Elements)
- V = f(props)
- props 像纯函数一样,只读,不可变化
props.children可以拿到 div 下的首尾标签的子元素
示例:
class 形式带状态组件
1
2
3
4
5
6
7
8
9
10
11
12
13
14
15
16
17
18
19
20
21
22
23
24
| import React from "react";
class NameCard extends React.Component {
render() {
const { name, number, isHuman, tags } = this.props;
return (
<div>
<h4>{name}</h4>
<ul>
<li>电话: {number}</li>
<li>{isHuman ? "人类" : "外星人"}</li>
<hr />
<p>
{tags.map((tag, index) => (
<span key={index}>{tag}</span>
))}
</p>
</ul>
</div>
);
}
}
export default NameCard;
|
函数式组件(无状态组件)
无状态,没有生命周期
示例一
1
2
3
4
5
6
7
8
9
10
| function Hello(props) {
return (
<div>
<h1>hello,{props.name}</h1>
<p>年龄: {props.age}</p>
</div>
);
}
ReactDOM.render(<Hello name="Tom" age="12" />, document.getElementById("app"));
|
示例二
1
2
3
4
5
6
7
8
9
10
11
12
13
14
15
16
17
18
19
20
| const NameCard = (props) => {
render(){
const {name, number, isHuman, tags } = this.props
return (
<div>
<h4>{name}</h4>
<ul>
<li>电话: {number}</li>
<li>{ isHuman ? '人类' : '外星人' }</li>
<hr/>
<p>
{ tags.map((tag,index) => (
<span key={index}>{tag}</span>
))}
</p>
</ul>
</div>
)
}
}
|
State(状态)
- 组件内部的数据可以动态改变
this.setState()是更新 state 的唯一途径
1
2
3
4
5
6
7
8
9
10
11
12
13
14
15
16
17
18
19
20
21
22
23
24
25
26
27
28
29
30
31
|
import React from "react";
class LikesButton extends React.Component {
constructor(props) {
super(props);
this.state = {
likes: 0,
};
this.increaseLikes = this.increaseLikes.bind(this);
}
render() {
return (
<div>
<button
type="button"
// 函数要使用驼峰式,最好使用箭头函数,否则this指向不明
onClick={() => {
this.increaseLikes();
}}
>
点赞 {this.state.likes}
</button>
</div>
);
}
}
export default LikesButton;
|
生命周期
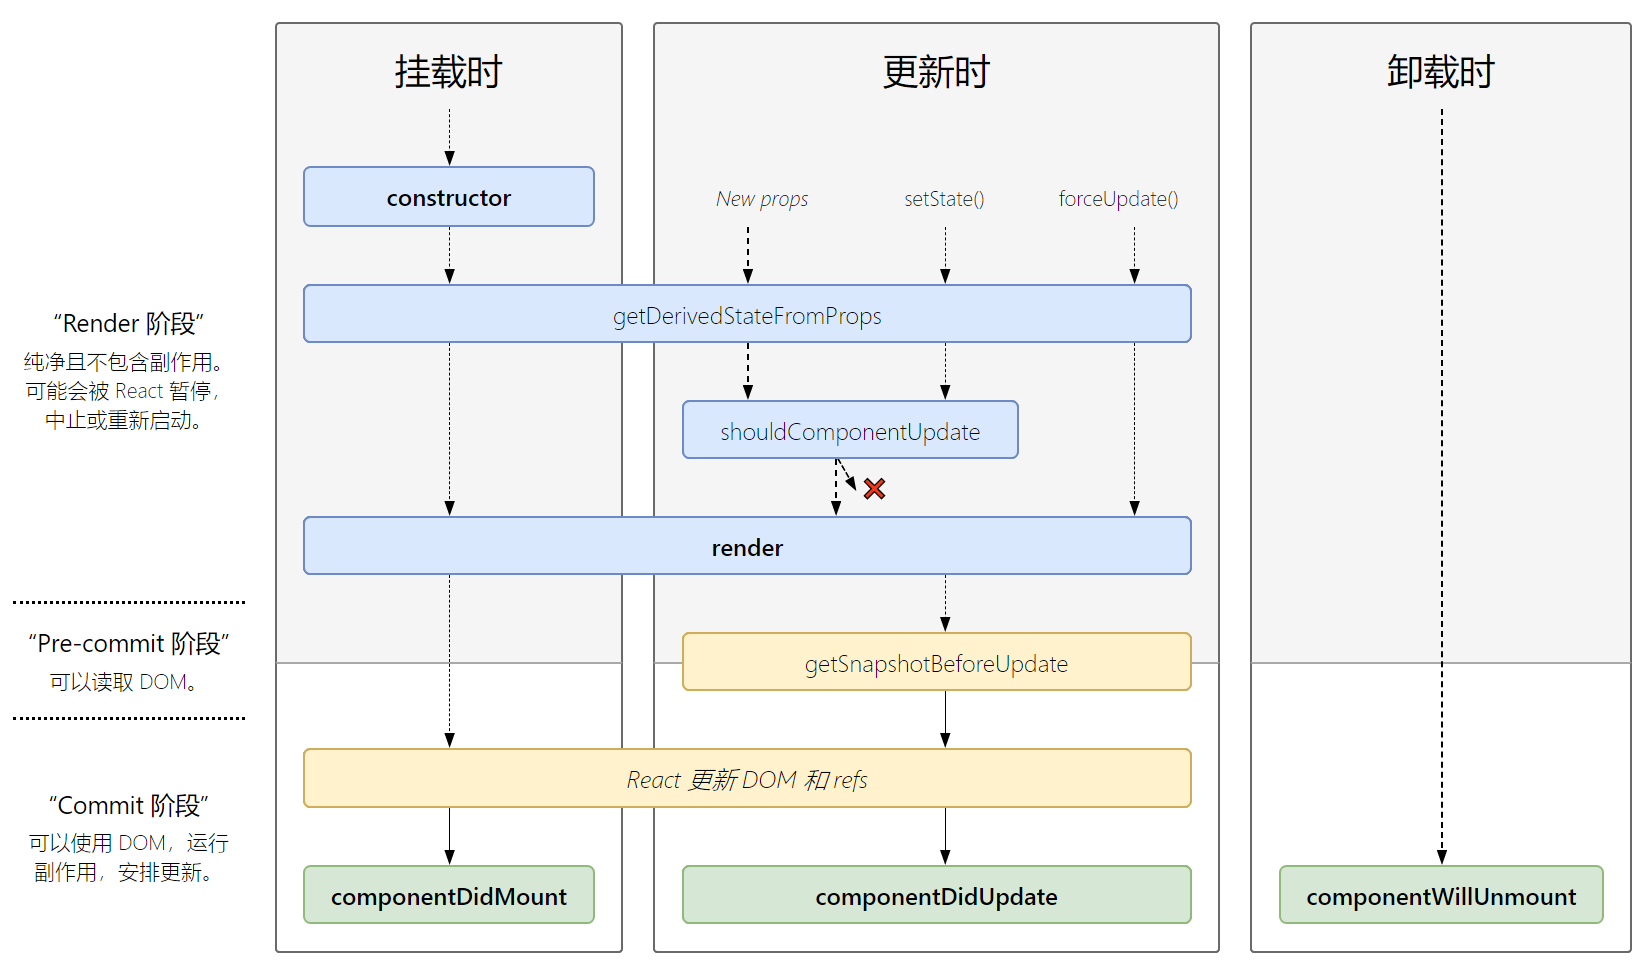
挂载
当组件实例被创建并插入 DOM 中,生命周期调用顺序为
构造函数初始化,最先被执行,初始化state等
static getDerivedStateFromProps()
这是一个静态方法,需要在前面增加 static 的属性
渲染函数,返回渲染的内容,当页面产生更新也会触发该方法。
render()方法是class组件中唯一必须实现的方法。
组件挂载之后,这个时候组件已经挂载完毕了
更新
当组件的props或state发生变化时会触发更新。组件更新的生命周期调用顺序如下:
static getDrivedStateFromProps()
组件即将被更新,这里参数分别对应前后被修改的内容,通过返回一个布尔值告知是否需要更新视图。
如果shouldComponentUpdate()返回false,则不会调用render()。
当视图更新,那么 Render 也会重新更新
getSnapshotBeforeUpdate在render之后componentDidUpdate之前输出,类似于中间件用来做一些捕获操作。
componentDidUpdate(prevProps, prevState, snapshot),三个参数 prevProps,prevState,snapshot,表示之前的 props,之前的 state,和 snapshot。snapshot 是 getSnapshotBeforeUpdate 返回的值.
卸载
当组件从 DOM 中移除时会调用如下方法:
componentWillUnmount
组件卸载,我们可以清除一些定时器,取消网络请求。
错误处理
当渲染过程,生命周期,或子组件的构造函数中抛出错误时,会调用如下方法:
static getDrivedStateFromError()componentDidCatch()
1
2
3
4
5
6
7
8
9
10
11
12
13
14
15
16
17
18
19
20
21
22
23
24
25
26
27
28
29
30
31
32
33
34
35
36
37
38
39
40
41
42
43
44
45
46
47
48
49
| constructor (props) {
super(props)
this.state = {}
console.log('1.constructor构造函数')
}
componentDidMount () {
console.log('componentDidMount')
Store.subscribe(() => {
this.setState({})
})
}
static getDerivedStateFromProps (nextProps, prevState) {
console.log('getDerivedStateFromProps')
console.log(nextProps, prevState)
return true
}
getSnapshotBeforeUpdate (prevProps, prevState) {
console.log(prevProps, prevState)
return 'top: 200'
}
componentDidUpdate (prevProps, prevState, snapshot) {
console.log(prevProps, prevState, snapshot)
}
componentWillUnmount () {
console.log('componentWillUnmount')
}
changeText () {
Store.dispatch({
type: 'changeName',
value: '我是ClassDemo中修改的名字: wangly'
})
}
render () {
console.log('3.render函数')
return (
<div className="App">
<p>{ Store.getState().redux_name }</p>
{ this.state.redux_name }
<button onClick={ this.changeText.bind(this) }>更改文本</button>
</div>
)
}
|
示例: 电子钟表
1
2
3
4
5
6
7
8
9
10
11
12
13
14
15
16
17
18
19
20
21
22
23
24
25
26
27
28
29
30
31
32
33
34
35
36
37
38
39
40
41
42
43
44
45
46
47
48
49
50
51
52
|
import React from "react";
class DigitalClock extends React.Component {
constructor(props) {
super(props);
this.state = {
date: new Date(),
};
}
componentWillMount() {
console.log("组件加载前");
}
componentDidMount() {
this.timer = setIntervalo(() => {
this.setState({
date: new Date(),
});
}, 1000);
}
componentWillUnmount() {
clearInterval(this.timer);
}
shouldCompnentUpdate() {
return true;
}
componentWillUpdate() {
console.log("数据将要更新");
}
componentDidUpdate() {
console.log("数据已经更新");
}
render() {
return (
<div>
<h1>{this.state.date.toLocalTimeString()}</h1>
</div>
);
}
}
export default DigitalClock;
|
事件处理中 this 的绑定
- 箭头函数
- class 中 bind 绑定
- 事件中使用箭头函数
- 事件中使用 bind 绑定
1
2
3
4
5
6
7
8
9
10
11
12
13
14
15
16
17
18
19
20
21
22
23
24
25
26
27
28
29
30
31
32
33
34
35
36
37
38
39
40
41
42
43
44
45
46
47
48
| class Hello extends React.Component {
constructor(props) {
super(props);
this.state = {
name: "Tom",
age: 12,
};
}
updateUser = () => {
this.setState({
name: "Jack",
age: 13,
});
};
render() {
return (
<div>
<h1>Hello,{this.state.name}</h1>
<p>年龄: {this.state.age}</p>
<button onClick={this.updateUser}>更新数据</button>
//或者在此处改为
<button onClick={() => this.updateUser()}>更新数据</button>
<button onClick={this.updateUser.bind(this)}>更新数据</button>
</div>
);
}
}
ReactDOM.render(<Hello />, document.getElementById("app"));
|
条件判断
通常使用三元运算符
1
| return <div>{isLogin ? <Login /> : <Logout />}</div>;
|
组件通信(组件传值)
子组件获取父组件的值 Props
通过 Props 可以快捷的拿到父组件的值.
- 在子组件上添加属性名和数据
1
| <classDemo name="Tom"></classDemo>>
|
- 在 class 中使用 Props
1
2
3
4
5
6
| constructor(props){
super(props)
this.state = {
defaultText: "默认文字"
}
}
|
- 通过
this.props.父组件绑定的属性名
1
| <p>{this.props.name}</p>
|
子组件传递父组件
通过 props 传递一个函数,当子组件需要改变父组件的值时,通过this.props.[自定义函数]执行回调.
1
2
3
4
5
6
7
8
9
10
11
12
13
14
15
16
17
18
19
20
21
22
23
|
class App extends React.Component {
constructor(props) {
super(props);
this.state = {
childText: "123",
};
}
onPropChange = (val) => {
this.setState({
childText: val,
});
};
render() {
return (
<div>
<p>{this.state.childText}</p>
<ClassDemo onChange={this.onPropChange}></ClassDemo>
</div>
);
}
}
|
1
2
3
4
5
6
7
8
9
10
11
12
13
14
15
16
17
18
| class ClassDemo extends React.Component{
constructor(props){
super(props)
this.state = {
defaultText: '默认文字'
}
}
changeText = ()=>{
this.props.onChange('321')
}
render(){
return (
<div className="App">
<button onClick={ this.changeText }>修改文本</button>
</div>>
)
}
}
|
列表渲染(循环)
1
2
3
4
5
6
7
8
9
10
11
12
13
14
15
16
17
18
19
20
21
22
23
24
25
| class List extends React.Component {
constructor(props) {
super(props);
this.state = {
list: [1, 2, 3, 4, 5],
};
}
render() {
const arr = this.state.list;
const listItem = [];
arr.map((item) => {
listItem.push(<li>{item}</li>);
});
return (
<div>
<ul>{listItem}</ul>
</div>
);
}
}
ReactDOM.render(<List />, document.getElementById("app"));
|
数据发生变化后需要使用 this.setSate 进行更改数据,否则不会生效
1
2
3
4
5
6
7
8
9
10
11
12
13
14
15
16
17
18
19
20
21
22
23
24
25
26
27
28
29
30
31
32
33
34
35
36
37
38
39
40
41
42
43
44
45
46
47
48
49
| class Forms extends React.Component {
constructor(props) {
super(props);
this.state = {
list: [],
val: "",
};
}
handleChange = (event) => {
this.setState({
val: event.target.value,
});
};
handleAdd = () => {
const { val, list } = this.state;
list.push(val);
this.setState({
list,
});
};
render() {
const arr = this.state.list;
const listItem = [];
arr.map((item, index) => {
listItem.push(<li key={index}>{item}</li>);
});
return (
<div>
<div>
<input
type="text"
value={this.state.val}
onChange={this.handleChange}
/>
<button onClick={this.handleAdd}>点击添加</button>
</div>
<ul>{listItem}</ul>
</div>
);
}
}
ReactDOM.render(<Form />, document.getElementById("app"));
|
受控组件和非受控组件
受控组件: React 控制输入的表单元素
实例: 留言框
1
2
3
4
5
6
7
8
9
10
11
12
13
14
15
16
17
18
19
20
21
22
23
24
25
26
27
28
29
30
31
32
33
34
35
36
37
38
39
40
41
42
|
import React from "react";
class CommentBox extends React.Component {
constructor(props) {
super(props);
this.state = {
value: "",
};
this.handleChange = this.handleChange.bind(this);
this.handleSubmit = this.handleSubmit.bind(this);
}
handleChange(event) {
this.setState({
value: event.target.value,
});
}
handleSubmit(event) {
alert(this.state.value);
event.preventDefault();
}
render() {
return (
<form onSubmit={this.handleSubmit}>
<div>
<label>留言内容</label>
<input
type="text"
placeholder="请输入内容"
onChange={this.handlechange}
value={this.state.value}
/>
</div>
<button type="submit">留言</button>
</form>
);
}
}
export default CommonBox;
|
非受控组件写法
将真实数据保存在 DOM 中
1
2
3
4
5
6
7
8
9
10
11
12
13
14
15
16
17
18
19
20
21
22
23
24
25
26
27
28
29
30
31
32
33
|
import React from "react";
class CommentBox extends React.Component {
constructor(props) {
super(props);
this.handleSubmit = this.handleSubmit.bind(this);
}
handleSubmit(event) {
alert(this.textInput.value);
event.preventDefault();
}
render() {
return (
<form onSubmit={this.handleSubmit}>
<div>
<label>留言内容</label>
<input
type="text"
placeholder="请输入内容"
ref={(textInput) => {
this.textInput = textInput;
}}
/>
</div>
<button type="submit">留言</button>
</form>
);
}
}
export default CommonBox;
|